
How to Film a Podcast: A Guide for Starting Video Podcasts
Podcasts may have started as an audio-only medium, but video podcasting is now dominant. And the reason is simple. Audiences want to see the conversations, reactions, demonstrations, and behind-the-scenes moments that make a show feel more personal.
In February 2025, YouTube reported that more than one billion people watch podcast content on the platform each month. That proves how important video has become to modern podcast discovery and consumption.
So, if you want to learn how to film a podcast, this guide will give you all the information you need to get started (or improve further if you’re already filming episodes).
We’ll cover how to choose the right podcast format, set up a practical podcast studio, record in person or remotely, interview guests, and turn each episode into polished podcast content for YouTube, TikTok, Instagram, LinkedIn, and other channels.
Need help filming your podcast? Check out the best podcast production companies for B2B and B2C podcasts.
Audio-Only vs. Video Podcasts: Why Film Your Podcast?
An audio podcast is easier and less expensive to produce because creators only need to manage sound quality, recording software, and distribution through platforms like Spotify and Apple Podcasts. It also suits listeners who consume episodes while commuting, exercising, or working.
A video podcast, however, requires additional equipment and production work, including a camera, lighting, framing, and video editing. But it gives audiences facial expressions and body language that can make interviews and conversations feel more engaging.
Filming also makes a podcast easier to discover. Edison Research found that 37% of Americans aged 12 and older watched a video podcast within the previous month in 2025, while 26% had watched one during the previous week.

More importantly, a filmed episode can also generate far more content than an audio file alone. Creators can publish the full conversation on YouTube, distribute the audio through an RSS feed, and turn memorable moments into clips for TikTok, Instagram, LinkedIn, and other social media platforms.
That’s a great way to promote the podcast online, get more followers, and even create secondary monetization opportunities. Sure, it’s extra production work and cost, but filming can expand reach, strengthen the connection with viewers, and give every episode a longer promotional life.
What Equipment Do I Need to Film a Podcast?
You essentially need a camera, microphone, some basic audio equipment, and editing software to film a podcast. But depending on the format and the quality you’re trying to achieve, you may need to shell out on more supporting equipment like lighting and camera support.
Start with equipment that delivers clear audio, stable video, and consistent lighting, then upgrade as your podcast content and production needs become more demanding.
Let’s go through the different types of equipment podcasters use:
Cameras
Your camera determines the resolution, framing, and overall visual style of your podcast. The best choice depends on whether you are filming a solo show, recording remote guests, or building a permanent multi-camera studio.
Smartphones: Best for beginners, mobile interviews, and on-location podcasting because modern phones can capture strong video (4K) without a separate video camera.
Webcams: A practical choice for solo podcasts and remote recording through Zoom, Riverside, Google Meet, or other video conferencing software.
Mirrorless and DSLR cameras: Best for creators who want interchangeable lenses, stronger low-light performance, and a more cinematic background. (A camera such as the Sony A6400 can work well in a permanent studio.)
Camcorders and cinema cameras: Suitable for long recording sessions, live productions, multi-camera shows, and professional studios with larger budgets.
Microphones
Audio quality matters even when the podcast is primarily watched on YouTube. Each host or in-person guest should ideally have a dedicated microphone positioned close to their mouth. Here are your options:
USB microphones: Plug directly into a computer and work well for solo hosts, beginners, and simple desk setups without an audio interface. They’re particularly good with the webcam setup.
XLR microphones: Best for scalable podcast studios because they connect to professional audio interfaces, mixers, and digital recorders using XLR cables.
Lavalier microphones for mobile recording: Small clip-on microphones are useful for walking interviews, demonstrations, travel podcasts, and smartphone recording kits.
Shotgun microphones for wide or on-location shots: A directional shotgun microphone can capture a speaker when a visible desk microphone or lavalier would interfere with the shot.
Dynamic versus condenser microphones?
Dynamic models like the ubiquitous Shure SM7B are better for untreated rooms because they can reduce surrounding noise. Condenser microphones capture more detail but may also reveal more reverb and background noise.
Audio Equipment
If you’re using a USB mic, you don’t need much additional audio hardware, but XLR mics require a device that connects them to the recording software. The right equipment also makes it easier to control levels, monitor sound, record backups, and manage several speakers. There are different solutions for this:
Audio interfaces: Convert signals from one or more XLR microphones into digital audio that can be recorded on a computer.
Podcast mixers: These are made for recording podcast audio. Devices like the Rodecaster Pro II or Zoom PodTrak P4 are great for multi-person shows, phone calls, sound samples, mix-minus routing, and live audio control.
Portable audio recorders: A digital recorder such as the Zoom H6 provides a reliable option for field interviews, mobile podcasting, and backup audio.
Headphones: Closed-back headphones let each participant monitor the recording and identify clipping, interference, or unwanted noise before it ruins an episode.
Microphone arms, stands, and cables: Boom arms and desk stands keep microphones consistently positioned, while dependable XLR male-to-female microphone cables minimize movement and connection issues. Audio interfaces provide the preamps and connections needed to record XLR microphones as separate inputs.
Lighting
Good lighting helps an affordable camera produce a cleaner image and keeps skin tones, exposure, and white balance consistent.
If you’re recording during daytime, natural window light and room lights may just be enough. But you don’t have as much control over brightness and color changes.
Many podcasters, especially for solo recordings, use ring lights paired with a webcam directly in front of the host. Then there’s the LED panel option (like the Elgato Key Light) that works well for desk setups and offers more control over brightness and color temperature.
Softboxes produce broad, diffused light that reduces harsh facial shadows and works well in a fixed podcast studio. Three-point lighting uses a key light, fill light, and backlight to separate the host from the background and create a more polished image.
Again, choose the lights based on your format, budget, and the lighting conditions in the space you’re using.
Position lights slightly above eye level where possible and avoid mixing several light sources with noticeably different color temperatures.
Camera Support and Accessories
Small accessories can make a major difference to reliability and production quality. They prevent shaky footage, interrupted recordings, depleted batteries, and storage problems during long interviews. Here’s what you may want to invest in:
Tripods: Keep each camera stable and make it easier to preserve the same rule-of-thirds framing between episodes.
Desk mounts: Save floor space and work well for webcams, compact cameras, microphones, and small LED panels.
Memory cards: Use cards with enough capacity and write speed for the camera’s chosen resolution and frame rate, with spare cards available for longer sessions.
Dummy batteries and power adapters: Provide continuous power so a mirrorless or DSLR camera doesn’t shut down during a long recording.
Capture cards: A device such as the Elgato Cam Link 4K converts a camera’s HDMI signal into a webcam-style input for OBS Studio, StreamYard, or remote recording software.
Teleprompters: Help solo hosts deliver scripted introductions, advertisements, calls to action, and complex explanations while looking toward the camera.
Acoustic panels and sound treatment: Sound panels, curtains, rugs, and soft furnishings reduce echo and reverb, improving the recording before noise cancellation or audio editing tools are applied.
Pro Tip: A camera setup may also require a micro-HDMI-to-HDMI cable, AC power supply, spare batteries, cable ties, and backup storage. Test every connection before guests arrive, particularly when a camera, capture card, audio interface, and recording software must all work together.
Recording and Editing Software
The software you need depends on whether you are recording locally, interviewing remote guests, streaming live, or editing completed video recordings.
Here are some of the best tools for recording and editing podcasts:
Riverside: Best for remote interviews that require locally recorded, separate audio and video tracks for each participant, even when internet quality fluctuates.
SquadCast: A remote recording platform for hosts who want separate locally captured tracks, progressive uploads, and protection against common connection failures.
StreamYard: Best for browser-based interviews, branded live shows, and streaming a podcast to YouTube and other social media destinations.
OBS Studio: A free, open-source option for local recording, live streaming, screen capture, camera switching, overlays, and advanced scene layouts on Windows, macOS, or Linux.
Descript: Suited to beginners and content teams that want to record, transcribe, edit audio and video by changing text, and create clips within one workflow.
Adobe Premiere Pro: A professional option for detailed multicamera editing, effects, titles, sound mixing, color adjustments, and long-form YouTube production.
Final Cut Pro: It’s recommended for Mac users who want fast editing, organized media management, and tools for synchronizing and switching between multiple camera angles.
DaVinci Resolve: Best for professional editing, advanced color correction, visual effects, motion graphics, and Fairlight audio tools in one application. There’s a free version, too, with most of the features included.
CapCut: Great for quickly turning long podcast recordings into captioned TikTok, Instagram, YouTube Shorts, and other social media clips using templates, auto captions, and reframing tools.
Again, a beginner can start with a smartphone or webcam, a USB microphone, headphones, a tripod, and a basic LED light. A more advanced studio usually requires mirrorless cameras, XLR microphones, three-point lighting, capture cards, acoustic treatment, remote recording software, and a dedicated post-production editor.
Things to Consider When Creating Your Podcast Filming Setup
Your podcast filming setup depends largely on the podcast format, where the hosts/guests are located, whether it’s live or pre-recorded, and even the platform you’re planning to publish it on. Let’s talk specifics:
Consider the Podcast Format
Decide whether the show will be a solo podcast, a co-hosted conversation, an interview, a panel discussion, a tutorial, or a narrative production. The format affects everything from camera placement and microphone selection to whether you need screen recording, b-roll, graphics, or multiple video angles.
Determine How Many People Will Appear on Camera
The number of hosts and guests determines how many microphones, headphones, camera angles, and audio inputs you need.
A solo setup can do with just one camera and a USB microphone. But as you add more people, whether co-hosts or guests, you’ll need more microphones and cameras. For instance, a four-person roundtable could need individual XLR microphones, a podcast mixer, several cameras, and wider lighting coverage.
Decide Whether Guests Will Be Local or Remote
Local guests can be recorded in the same podcast studio or room with shared cameras, lighting, and audio equipment. Remote guests require a reliable platform, ideally with separate locally recorded tracks to protect audio and video quality when internet connections are unstable.
Choose Between Live and Prerecorded Episodes
Live podcasting requires dependable internet, real-time switching, accurate audio levels, and software like StreamYard, OBS Studio, or ECamm Live.
Prerecorded episodes provide more control because mistakes, pauses, technical problems, and weaker sections can be removed during audio editing and video post-production.
Match the Equipment to Your Budget
Build the setup around the equipment that will make the greatest difference, beginning with a good microphone, stable camera, and flattering light.
A smartphone, USB mic, tripod, and LED panel may be enough at first. But as your podcast audience grows and you start generating revenue, you can invest in more advanced equipment and professional editing software.
Plan for Desired Video Quality
Higher resolution creates more flexibility for cropping and reframing, but it also requires faster memory cards, more storage, stronger editing hardware, and longer upload times.
Choose a video quality your computer, workflow, and publishing schedule can manage consistently. The good news is that you should be able to capture 4K video even with a phone or budget-friendly camera.
Podcast Platforms and Their Impact on Recording
The platform on which you plan to publish should influence how you film and package each episode.
In 2026, Apple Podcasts started supporting video podcast delivery alongside audio through compatible hosting providers. Spotify also allows creators to upload video episodes starting 2020. And YouTube treats each podcast episode as a video within a dedicated podcast playlist. It’s also the most popular podcast platform in the U.S., with one in three listeners using it to listen and watch their favorite podcasts.
If YouTube, for example, is your primary platform, you’d want to prioritize strong visuals and unique editing techniques. It’s also the platform that essentially runs on visual discovery. So, besides recording the actual episode, you also have to pay attention to thumbnails, titles, and short promotional clips.
Spotify and Apple Podcasts also make video available to established podcast audiences, but creators should still ensure the episode works as an audio podcast for listeners who are not watching.
Pro tip: Internal company podcasts have different priorities. Because they are distributed privately to employees, customers, or partners, they don’t need to compete for public search visibility or social media engagement. Clear audio, understandable presentations, and secure access may matter more than cinematic lighting, elaborate sets, or highly polished promo materials.
How to Film a Podcast: Step-by-Step
Filming a podcast episode is simple if you take a structured approach. Again, how it’s set up and filmed depends almost entirely on the format. But generally speaking, here are the steps to record a video podcast.
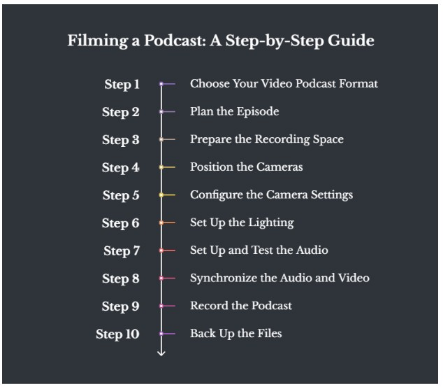
Step 1: Choose Your Video Podcast Format
There are various formats, and each one has its own base requirements:
Solo presentation: One host speaks directly to the camera, typically using notes, slides, demonstrations, or a teleprompter. A single camera, a microphone, a tripod or desk mount, and a key light are usually enough.
Co-hosted conversation: Two hosts discuss topics together in the same room, typically using a wide shot or separate camera angles. Each person should have their own microphone and headphones, while a podcast mixer or multi-input audio interface can record separate audio tracks.
In-person interview: A host and guest sit together in a podcast studio for a face-to-face conversation. Use at least two microphones and consider two or three cameras to capture a wide shot and individual close-ups.
Remote interview: Participants join from different locations via a remote recording platform such as Riverside, SquadCast, Zencastr, or Descript Rooms. Each speaker needs a microphone, headphones, webcam or camera, stable internet connection, and a quiet, well-lit recording space.
Panel discussion: Several hosts or guests discuss one topic, either in person or remotely. When doing it in-person, this format requires more audio inputs, individual XLR microphones, broader lighting coverage, and enough cameras to capture the full group without relying on one overly wide shot.
Live-streamed podcast: The episode is broadcast in real time through YouTube, LinkedIn, or another social media platform. You will need reliable video conferencing or streaming software, along with fast internet, real-time audio monitoring, and a backup recording.
On-location or mobile podcast: The podcast is filmed outside a permanent studio, such as at an event, workplace, conference, or outdoor location. Portable equipment may include smartphones or compact cameras, lavalier or shotgun microphones, a digital recorder, battery-powered LED lights, tripods, and spare batteries or memory cards.
Step 2: Plan the Episode
Create a simple outline or podcast script that covers the introduction, key discussion points, transitions, any sponsor messages, and closing call to action.
For interviews or panel discussions, consider guest scheduling in advance, so you don’t have any unexpected no-shows at the time of recording. Share the topic and main questions with guests in advance so everyone knows what to expect.
Also identify any visual elements you will need, such as slides, product demonstrations, screen recordings, b-roll, or on-screen graphics.
Planning these details before recording helps the conversation flow naturally, avoids interruptions during filming, and reduces the amount of editing required later.
Pro Tip: Plan parts or moments that could potentially become short-form clips like a rapid-fire round or a personal story. This is particularly important for podcasters who use social media for promotions.
Step 3: Prepare the Recording Space
Choose a quiet room with minimal echo, traffic noise, air-conditioning hum, or other distractions. You don’t necessarily need a studio, but filming in one can give a professional look, particularly for B2B podcasts.
Add rugs, curtains, upholstered furniture, or acoustic panels to reduce reverb, and remove visual clutter from the background.
Before recording, silence phones, close unnecessary apps, and test the room for background noise.
Keep water, notes, cables, and spare batteries within reach so you don’t have to interrupt the session.
Step 4: Position the Cameras
Place the main camera at or slightly above eye level to create a natural, flattering angle.
Use the rule of thirds when framing each person, leave a small amount of headroom, and avoid placing subjects too close to the background.
In interviews or co-hosted podcasts, use a wide shot to capture everyone and additional cameras for individual close-ups where possible.
Make sure each camera matches in resolution, frame rate, white balance, and exposure so switching between angles feels consistent.
Step 5: Configure the Camera Settings
If you’ve invested in high-resolution cameras, make sure to get the best out of them with the right settings.
Select resolution and frame rate: Record in at least 1080p for a clear, professional image, or use 4K if you need extra flexibility for cropping and reframing. A frame rate of 24 or 30 fps works well for most video podcasts. 60 fps is better suited to fast movement or slow-motion footage.
Set shutter speed: As a general rule, set the shutter speed to roughly double the frame rate, such as 1/50 for 24 fps or 1/60 for 30 fps. This creates natural-looking motion without making gestures appear overly sharp or blurry.
Adjust aperture and ISO: Use the aperture to control brightness and background blur, while keeping enough depth of field to keep the speaker in focus. Set ISO as low as the lighting allows to reduce grain and digital noise.
Set white balance manually: Choose a fixed white balance that matches the lighting (automatic settings don’t always do that). This prevents skin tones and background colors from shifting during the recording.
Lock focus and exposure: Once the subject is correctly framed and lit, lock the focus and exposure so the camera doesn’t continually adjust during the conversation. But if the host or guest is moving around, you’ll need reliable face or eye-tracking autofocus.
Match settings across multiple cameras: Use the same resolution, frame rate, shutter speed, white balance, and picture profile on every camera. That makes it easier to switch between angles and maintain a consistent look during editing.
Step 6: Set Up the Lighting (If You’re Using That)
Position the main light slightly above eye level and at roughly a 45-degree angle from the subject.
Add a softer fill light on the opposite side to reduce harsh shadows, and use a backlight or practical background light to create separation and depth.
Natural window light, a ring light, or a single LED panel may be enough for a basic setup. For a more polished look, use three-point lighting and keep the color temperature consistent across all lights to avoid uneven skin tones.
Step 7: Set Up and Test the Audio
Position each microphone close to the speaker’s mouth, usually about four to eight inches away, and slightly off-axis to reduce plosives.
Set the input gain so voices sound clear without clipping, then monitor through headphones for background noise, echo, cable interference, or uneven volume levels.
Record a short test before recording the full episode and listen to it through headphones. Don’t rely only on the level meters. When possible, record each participant on a separate track and create a backup using a portable audio recorder or the camera’s internal audio.
Step 8: Synchronize the Audio and Video
Record a clear hand clap at the beginning of the session so the sound spike can be matched with the visual movement during editing.
If you are using multiple cameras or a separate audio recorder, keep every device running continuously where possible and use timecode or automatic synchronization tools for more complex productions.
Step 9: Record the Podcast
Start recording on the audio system, cameras, and remote recording software before the formal introduction begins.
Monitor audio levels, battery life, storage capacity, camera focus, and internet stability throughout the episode. But don’t stop for minor mistakes that can be removed later.
Leave a few seconds of silence at the beginning and end of the recording to make editing easier.
For remote interviews, ask each participant to keep their browser or recording app open until all locally recorded files have finished uploading.
Step 10: Back Up the Files
Copy the audio, video, graphics, and project files to at least two separate storage locations immediately after recording. A practical approach is to keep one copy on a local drive and another on an external drive or secure cloud storage service.
Organize the files into clearly labeled folders for each episode, camera, participant, and audio track.
Just to be safe, don’t format memory cards or delete original recordings until the episode has been edited, approved, published, and checked on the intended platforms.
How to Film Different Types of Podcasts
We’ve covered the basic steps of shooting a podcast episode. Now, let’s talk about filming specific podcast formats and what you may want to do differently.
How to Film a Solo Podcast
A solo podcast can be filmed easily with one primary camera, one microphone, and a simple lighting setup.
Position the camera at or slightly above eye level and frame yourself from the chest up, leaving enough space for captions or graphics. Place the microphone close enough to capture clear audio without blocking your face. Use a teleprompter or notes near the lens so you can stay organized without looking as though you are reading a script word for word.
To keep the video visually engaging, add screen recordings, slides, b-roll, on-screen graphics, or occasional footage from a second camera angle.
You can record with a smartphone, webcam, or mirrorless camera, based on your budget, and pair it with a USB or wired microphone.
How to Film a Co-Hosted or Interview Podcast
A co-hosted or interview podcast can be filmed with one wide two-person shot. However, individual cameras usually create a more dynamic and professional result.
Position the individuals so they can look at each other naturally while maintaining consistent eye lines and similar framing. Angle the microphones carefully so neither person has to speak across the other host’s mic, which can cause uneven sound and make editing more difficult.
Record each person on a separate audio track through a multi-input audio interface, podcast mixer, or recorder.
A two-person setup can use mirrorless cameras or smartphones with tripods, XLR microphones on boom arms, and software such as OBS Studio, Riverside, or ECamm Live. During editing, switch between the wide shot and individual close-ups based on who is speaking. Occasionally keep both hosts visible to capture reactions and conversational chemistry.
How to Film a Remote Podcast
For a remote podcast, ask every guest to wear headphones and use a dedicated USB microphone, XLR microphone, or high-quality headset microphone. Laptop microphones aren’t reliable enough to record high-quality audio.
Send simple instructions before the session covering camera height, framing, lighting, background noise, internet connection, and audio preferences so guests can prepare their space properly.
Use a remote recording platform that captures each participant locally and saves separate audio and video tracks. This double-ender approach produces better results than relying only on a compressed Zoom or Google Meet call.
Recommended tools include Riverside, SquadCast, Zencastr, Descript Rooms, and Cleanfeed for audio-focused recordings, while StreamYard is best for when the podcast will also be live-streamed.
How to Film a Panel or Roundtable Podcast
A panel or roundtable podcast requires enough cameras, microphones, and audio inputs for every participant. Give each speaker an individual microphone and use a wide master shot that shows the full group, supported by close-up or at least two-person angles for reactions and active speakers.
Plan the seating carefully so microphones, tripods, cameras, and participants don’t block one another or create awkward sightlines.
Multi-person recordings are easier to manage when a producer or camera operator monitors framing, sound levels, battery life, and storage while the discussion is underway.
OBS Studio, ECamm Live, Riverside, or StreamYard can help manage layouts and recordings, while professional editing software can synchronize the separate tracks and switch between angles.
How to Film a Live Podcast
Choose a reliable streaming platform that supports your preferred destinations, audience size, branding, and guest format.
Before going live, test the upload speed and stability of your internet connection, use a wired Ethernet connection where possible, and keep a backup connection such as a mobile hotspot available.
Prepare scenes, camera layouts, overlays, lower-third titles, intro screens, and audience comments before the broadcast begins.
Assign someone to monitor the stream, audio levels, viewer feedback, and technical issues in real time so the host can focus on the conversation.
Always record a high-quality local backup instead of the compressed livestream recording. StreamYard is the best for straightforward browser-based broadcasts, OBS Studio for advanced scene control, ECamm Live for Mac-based production, and Riverside for live shows that also require locally recorded participant tracks.
How to Film an On-Location or Mobile Podcast
An on-location podcast calls for lightweight equipment you can set up quickly and carry between locations.
Use a smartphone, compact mirrorless camera, or small video camera with a portable audio recorder. Choose lavalier microphones for interviews or shotgun microphones when the mic needs to remain outside the frame.
Environmental conditions are typically the biggest challenge. Use windscreens or furry windshields outdoors, monitor the audio through headphones, and move away from traffic, crowds, machinery, or reflective surfaces where possible.
Be prepared for changing natural light by carrying a battery-powered LED panel, and check the exposure and white balance whenever the location changes.
Single-Camera vs. Multi-Camera Podcast Filming
A single-camera setup is simpler, less expensive, and easier to manage, making it suitable for solo creators and new video podcasts. Multi-camera filming requires more equipment and editing, but it creates a more dynamic viewing experience by allowing the editor to switch between speakers, reactions, and wide shots.
| Factor | Single-camera filming | Multi-camera filming |
|---|---|---|
| Best for | Solo podcasts, simple interviews, and beginner setups | Co-hosted shows, interviews, panels, and premium productions |
| Equipment required | One camera, tripod, microphone setup, and basic lighting | Two or more cameras, additional tripods, more storage, and wider lighting coverage |
| Setup complexity | Quick to arrange and easy to operate alone | Requires careful camera placement, matching settings, and more monitoring |
| Production cost | Lower because fewer cameras and accessories are needed | Higher due to extra cameras, lenses, cables, capture cards, and storage |
| Visual variety | Limited to one angle unless footage is cropped or supplemented with b-roll | Provides close-ups, wide shots, reactions, and alternative angles |
| Editing workload | Faster because there is only one main video recording | Takes longer because footage must be synchronized and camera angles selected |
| Viewer experience | Clear and consistent but may become visually repetitive | More engaging and similar to a professional television or studio interview |
By the way, you don’t always need several physical cameras to achieve a multi-camera effect. Recording in 4K lets editors crop one wide shot into several 1080p close-ups. Even in solo-host setups, a single-camera recording can feature close-ups (via editing) for visual variety.
Tips to Make Your Video Podcast More Professional
Use consistent framing and camera settings: Keep the camera height, focal length, exposure, white balance, and composition consistent across episodes.
Create a recognizable set: Use the same backdrop, furniture, and layout so viewers immediately associate the visual style with your podcast.
Add depth to the background: Position the host away from the wall and use layered objects or lighting to prevent the image from looking flat.
Keep branding subtle: Include logos, brand colors, or signage without allowing them to dominate the frame.
Use practical lighting and visual accents: Lamps, shelf lights, or small LED accents can add warmth and personality to the background.
Maintain consistent wardrobe and color choices: Choose clothing and set colors that complement each other and avoid patterns that cause visual distortion on camera.
Avoid clutter and distracting movement: Remove unnecessary objects, reflective surfaces, and moving elements that could draw attention away from the conversation.
Get Your Free Podcast Filming Checklist
Here’s a comprehensive checklist for all the necessary steps before, during, and after the filming of your podcast episode. Keep it handy to prevent disruptions or technical difficulties.
If you’re planning a B2B podcast and need professional support to film episodes with hosts and guests, Content Allies can help. With extensive experience working in the B2B podcasting space, we can take care of planning, producing, editing, and distributing on the right platforms.
Get in touch to discuss your next video podcast.
FAQ
How do I film a podcast with people in different locations?
Film a podcast with people in different locations by using remote recording software that captures separate audio and video tracks for each participant. Platforms like Riverside, SquadCast, and StreamYard record locally to improve quality. Use a stable internet connection, wear headphones, and synchronize lighting and camera settings for a professional result.
Can you film a podcast with a smartphone?
Yes, you can film a podcast with a smartphone if it records at least 1080p and has good lighting and audio support. Pair the phone with an external microphone, tripod, and LED light to achieve professional-looking results.
What is the best camera for filming a podcast?
The best camera for filming a podcast depends on your budget and production goals. The Sony ZV-E10 offers excellent value for most creators with 4K recording, interchangeable lenses, and reliable autofocus. Premium options include the Sony FX30 and Canon EOS R7 for higher-end productions.
What microphone should you use for a video podcast?
Use a dynamic microphone for a video podcast to reduce background noise and improve vocal clarity. The Shure SM7B, Rode PodMic, and Audio-Technica ATR2100x are some of the most popular choices.
How much does a podcast filming setup cost?
A podcast filming setup typically costs between $300 and $5,000 or more, depending on equipment quality. A basic setup with a smartphone, microphone, lighting, and tripod costs about $300 to $800. A professional multi-camera studio can cost more than $5,000.
What software do I need to film my podcast?
Film your podcast by using recording software that captures high-quality audio and video. Riverside, SquadCast, OBS Studio, and StreamYard support local or live recording. Choose software based on whether you record remotely, livestream, or produce in a studio.
Compare Riverside and Zencastr for remote recording.
What are the best tools for editing a podcast?
Adobe Audition, Descript, Audacity, Final Cut Pro, and DaVinci Resolve are some of the leading editing tools in the podcasting space. Choose audio-only software for traditional podcasts or video editors for video podcasts.
Should a podcast be recorded in 4K?
Record a video podcast in 4K if you plan to crop footage, publish on YouTube, or future-proof your content. 4K isn’t necessary, though. 1080p can work if you want smaller file sizes and faster editing.